When building or upgrading a PC, managing airflow is crucial for optimal performance and longevity. One of the most critical components in maintaining a stable temperature is the cooling system, with PC fans playing a central role. While hooking up PC fans may seem like a straightforward task, it’s important to understand different fan types, connections, and placements to ensure you’re maximizing your system’s cooling efficiency. In this guide, we’ll take you through everything you need to know about installing and connecting PC fans, including the innovative HOLO FAN by COOLIFY, which brings a futuristic touch with its holographic visuals.
(Image Source: Youtube)
Understanding PC Fans
Before jumping into installation, it’s helpful to understand the different types of PC fans available. Fans differ in size, speed, and the way they are powered and controlled.
- Standard Case Fans:These fans typically come in 80mm, 120mm, and 140mm sizes. Larger fans often produce less noise at lower RPMs while providing decent airflow.
- PWM (Pulse Width Modulation) Fans:PWM fans have four pins, allowing them to be controlled dynamically via the motherboard. These fans can change their speed based on the system’s temperature needs.
- RGB and ARGB Fans:Popular among gaming setups, RGB fans include customizable lighting options. ARGB fans, on the other hand, allow for more advanced individual LED customization.
- Specialty Fans (HOLO FAN):With technological advancements, unique products like the HOLO FAN from COOLIIFY offer both functionality and aesthetics. The HOLO FAN integrates a hologram display into the fan, adding a futuristic and immersive effect to your PC case, making it not only a cooling tool but a centerpiece of your setup.
Types of Fan Connections
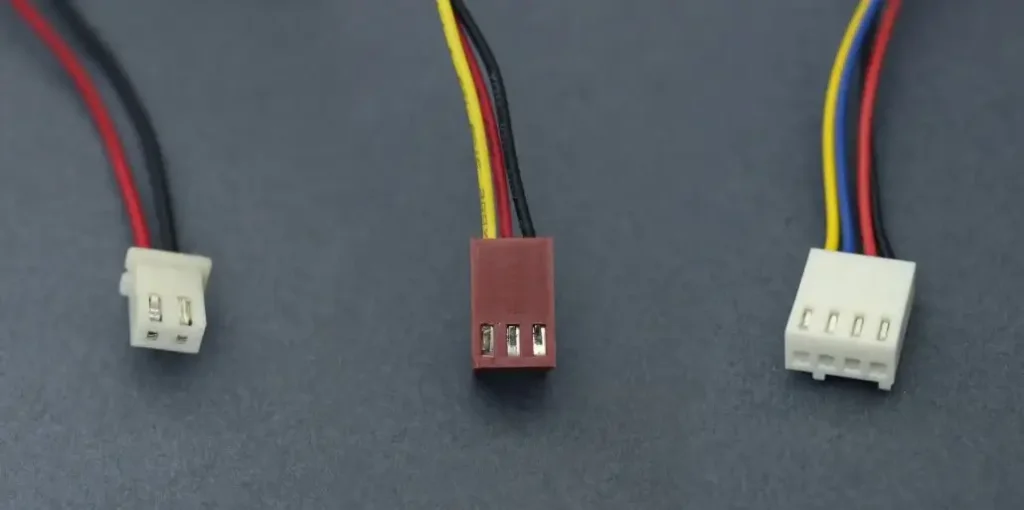
(Image Source: ekwb.com)
PC fans can be connected in several ways depending on the type of fan and your motherboard.
- 3-Pin Connectors:These fans have three wires:one for power, one for ground, and one for fan speed monitoring. These can be connected directly to the motherboard but don’t offer speed control like PWM fans.
- 4-Pin PWM Connectors:The fourth pin allows for dynamic fan control, enabling the motherboard to regulate the fan speed based on the system’s temperature. This is common for CPU coolers or high-end cooling setups.
- Molex Connectors:Some older or budget fans use Molex connectors, which connect directly to the power supply unit (PSU). However, these fans typically run at full speed as they don’t support RPM regulation.
- ARGB/RGB Connectors:These fans come with an additional connector for controlling lighting effects, which can be plugged into dedicated RGB headers on the motherboard.
Tools and Components You Will Need
Before beginning the installation, make sure you have the following tools and components ready:
- Phillips head screwdriver
- PC fans
- Compatible screws (typically provided with the fans)
- Power supply cables (for Molex or SATA-powered fans)
- Motherboard fan headers for PWM or 3-pin fans
- RGB/ARGB controller or motherboard with ARGB/RGB headers (for lighting-enabled fans)
Step-by-Step Guide to Hook Up PC Fans
Step 1:Decide Fan Placement
Correct fan placement ensures efficient airflow through your PC case, preventing hot air from building up around critical components like the CPU and GPU.
- Intake vs. Exhaust:Generally, you want a balance between intake (cool air entering) and exhaust (hot air exiting) fans. Most PC cases will allow front and bottom fans for intake, while rear and top fans serve as exhausts.
- Airflow Direction:Fans are designed to pull air from one side and push it out the other. Look for arrows on the fan casing that indicate airflow direction. Always make sure that intake fans pull cool air in, and exhaust fans push hot air out.
When incorporating the HOLO FAN, its placement is crucial not only for airflow but also to showcase its hologram display. Placing it on the front or top of the case can make it a visual centerpiece while still contributing to efficient cooling.
Step 2:Mount the Fans in the Case
Now that you’ve decided where to place your fans, it’s time to mount them.
- Align the Fan:Make sure the fan is aligned with the mounting holes in your case. Most cases have pre-drilled holes and brackets for easy installation.
- Secure with Screws:Use a Phillips head screwdriver to secure the fan to the case. Tighten the screws, but don’t overtighten to avoid damaging the fan’s frame.
If you’re installing the HOLO FAN, it’s a good idea to make sure the holographic display is visible and not obstructed by other components.
Step 3:Connect the Fan Power Cables
Once the fans are mounted, it’s time to connect them to the system for power and control.
- 3-Pin or 4-Pin Connectors:If your fan has a 3-pin or 4-pin connector, locate the appropriate fan header on the motherboard. The fan headers are usually labeled as “SYS_FAN” or “CHA_FAN.”For PWM fans, plug the 4-pin connector into a 4-pin header to enable dynamic speed control. connect the 4-pin PWM cable to the motherboard to allow for temperature-based fan speed adjustments.
- Molex Connectors:If your fan uses a Molex connector, plug it directly into a Molex power cable from your power supply. Note that Molex-connected fans will run at full speed unless otherwise controlled by a separate fan hub.
Step 4:Connect Lighting Cables (For RGB/ARGB)
- RGB/ARGB Header:Most RGB fans come with a 3-pin or 4-pin RGB connector, which should be plugged into the appropriate header on the motherboard. The header is usually labeled “RGB” or “ARGB.”
- Dedicated Controller:If your motherboard doesn’t have an RGB or ARGB header, many RGB fans, come with a dedicated controller. This controller can be powered through SATA or Molex and allows you to customize lighting through software or hardware buttons.
In the case of the HOLO FAN, connecting the accompanying software to customize the display and adjust the hologram images.
Step 5:Manage Cables
Proper cable management is essential for maintaining airflow and keeping your PC build clean and efficient.
- Use Zip Ties or Velcro Straps:Once all the fans are connected, use zip ties or Velcro straps to bundle cables together and keep them out of the way.
- Route Cables Behind the Motherboard Tray:Many PC cases come with cable routing cutouts. Use these to route the cables behind the motherboard tray, keeping them hidden and allowing for better airflow in the main chamber.
Step 6:Test and Monitor
Once everything is installed, power on your system to test the fans.
- Check Airflow:Verify that the fans are rotating in the correct direction (intake or exhaust). You can use a small piece of paper to check the airflow.
- Monitor RPM and Temperatures:Use motherboard software or third-party tools like HWMonitor to check fan speeds and system temperatures. For PWM fans, ensure that they adjust speed based on CPU/GPU temperature.
- Customize Lighting/Display:For RGB or HOLO FANs, open the software provided by the manufacturer to customize the lighting or hologram display effects. The HOLO FAN‘s hologram display can be customized to show various animations, logos, or text, making it a standout feature in your build.
5. Tips for Optimal Fan Performance
To get the most out of your PC fans, here are a few additional tips:
- Fan Curves:If using PWM fans, set up custom fan curves in your BIOS or with software. This allows the fans to run at different speeds based on temperature thresholds, ensuring quiet operation when idle and maximum cooling when under load.
- Dust Filters:Make sure your intake fans are equipped with dust filters to prevent dust buildup inside your case, which can affect both airflow and component longevity.
- Balance Airflow:Aim for a balanced airflow setup, with slightly more intake than exhaust (positive pressure). This helps prevent dust from entering through gaps in the case.
Conclusion
Hooking up PC fans may seem like a simple task, but getting it right can significantly impact your system’s cooling efficiency and performance. By understanding fan types, connections, and placement strategies, you can optimize your PC’s airflow while maintaining a clean, organized setup. The inclusion of specialty products like the HOLO FAN not only enhances cooling but adds a visual flair that sets your system apart. Whether you’re a casual user or a gaming enthusiast, following this guide will ensure your PC runs cool and looks fantastic.